Putting It On Paper | Save Your Photos Month
This entry is a part of a series celebrating of September’s Save Your Photos Month. Stay tuned for more!
Images produced on metal and glass, though revolutionary, were also often costly and difficult to produce. They were direct positive images that required no negative, but they were fragile and needed to be cased. In 1855, the introduction of the glass plate negative would change the course of photography. Though still using a similar wet collodion process, the glass plate negative allowed for printing on paper. And this opened a world of possibilities.
The Wet Collodion Process
Your first question may be, what is a wet collodion process? A wet collodion process (also just called a collodion process) was a way of preparing glass plate negates to be printed on paper. The piece of glass would be coated with collodion, defined as a syrupy solution of nitrocellulose in a mixture of alcohol and ether, in a darkroom. According to the Royal Collection Trust, the plate would then be made light-sensitive with further chemicals.
“Before the plate could dry, it would be placed in the camera and exposed. Then the plate would be returned to the darkroom and developed, rinsed, fixed, washed, dried, and varnished. It was then ready for printing.” (Royal Collection Trust)
Want to know more about this process and how it worked? Here are some great videos about the process from The Getty Museum and The Royal Collection Trust.
- The Wet Collodion Process – The Getty Museum (link will take you to YouTube)
- The Wet Collodion Process – The Royal Collection Trust (link will take you to the Royal Collection Trust’s website)
Now that you have a better understanding of the creation process, let’s look at some popular paper image types!
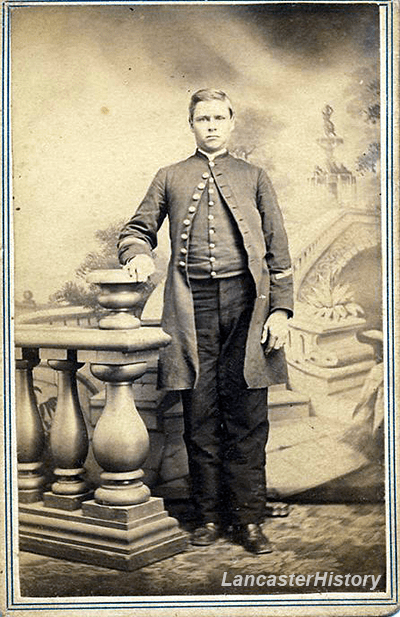
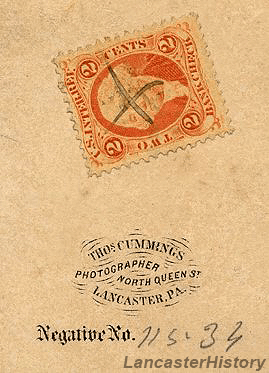
The Carte de Visite
By the 1860s, photography was a new booming business and the carte de visite was all the rage. Named for the French visiting cards often traded amongst family and friends, this was the first notable incarnation of paper photographic prints. Usually measuring 4.5 x 2.5 inches, the print was mounted on cardstock. Multiple copies could be made at once and given to loved ones. As a means to promote their business, photographers would often print their name or studio name and address on the reverse. These small mementos were popular during the 1860s and early 1870s. Carte de visites printed between 1864 and 1866 will have a U. S. Internal Revenue stamp affixed to the back, owing to a paper tax during the Civil War.
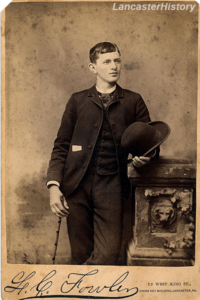
The Cabinet Card
As photography grew in popularity, so did the size of photographs. Introduced in the 1870s, cabinet cards measured 4.5 x 6.25 inches, and like cartes de visite, they were mounted on cardstock. Cardstock was plain at first, but later versions came in various colors or with gilt or fancy trimmed edges. And, also, like the carte de visite, photographers used their product for advertising. Larger images meant photographs could be displayed in the home. As time went on, the images grew in size. Cabinet cards were popular from the 1870s to the early 1900s.
Now It’s Personal
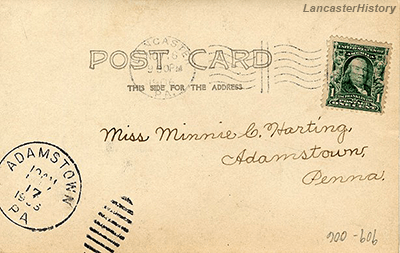
In 1900, Kodak introduced the Brownie camera and photography was no longer in the hands of professionals. Anyone with a camera could take snapshots whenever the mood struck. Personal photography was now a reality. Perhaps one of the most interesting phenomena of this era was the real photo post card. Post cards were like the early version of the instant message. Pop one in the mail in the morning and it would reach your pal by evening, locally speaking. With the advent of the Brownie, people could use their own photos to make post cards. Before 1907, only the address could be written on the back of a post card. Various types of printing on the reverse of post cards can be used to date them.


Preservation Hints
As with all historic photographic images, display a reproduction and keep your originals in a safe, climate controlled space. If possible, keep them stored in acid-free folders or boxes. Remove any rubber bands or paper clips that may be attached. Ideally, writing on paper prints is not a good idea, but if you must write identification information on them – use a pencil and write on the back, not the image.
From PhotoBlog